
This document helps to explain what ImageWorsener’s -intclamp option does.
Consider this little test image:
| in.png |
|---|
|
Here it is, magnified:

Notice in particular that it is perfectly symmetric about a diagonal line from the lower-left to the upper-right:

Now I’m going to enlarge it using ImageMagick, a popular image processing application (I used version 6.6.6-5).
Note: Like most copies of ImageMagick, the one I used was compiled without the “High Dynamic Range Imaging” option. When HDRI is enabled, ImageMagick does not exhibit the quirk shown here. Also, this only applies to its -resize operator, and not necessarily to -distort or anything else.
convert in.png -filter lanczos -resize 250x out.png
| out.png |
|---|
 |
Look closely, and you can see that the enlarged image does not have the symmetry of the original. There are some vertical streaks in it, but no corresponding horizontal streaks. Why would enlarging a symmetric image make it asymmetric?
Here is a graph of the resampling filter I used:
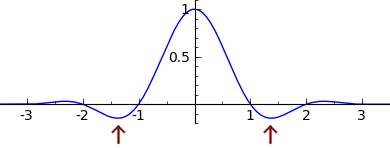
Like many (but not all) such filters, there are places where it goes below zero. There’s a reason it does this, but it can have some strange effects. It’s what causes the resized image to contain colors that are darker and bluer than any colors present in the original image.
This filter has the property that it is separable, which means that it can be applied in two passes. If you first resize the image in one dimension, and then in the other dimension, you will get the same result as if you had done it in a single pass, or if you had resized the dimensions in the opposite order.
ImageMagick (I’m speculating) takes advantage of this by resizing the image in two stages. In the first stage, it enlarges it horizontally, yielding an intermediate image that would look like this:

Remember those negative regions in the graph above? They can cause the samples to have values that are outside of the range that is normally possible. For example, if white is encoded as 255, you could actually get a value like 270: whiter than white. When that happens, an application might (or might not) deal with it by “clamping” the value: changing it to the nearest supported value, which in this example would be 255.
The problem is that adding this clamping operation to your processing makes it non-separable. So, doing the resize in two stages will affect the output, and it will make a difference which dimension you resize first.
Ideally, you should not do any any clamping until after the whole resizing operation is complete. That means, if your algorithm uses multiple passes, your intermediate image format must be able to support sample values outside the usual range. Based on my limited testing of imaging applications, there are many that clamp the intermediate samples, and also many that do not.
If you don’t clamp the intermediate samples, you get a perfectly symmetric image:

In real-world images, this issue is not much of a problem. You’ll probably never notice whether your image scaling application does it right or not, and doing it right could hurt performance or have other disadvantages.
Note: The image processing above was done without proper gamma correction. It made the issue more visible, and it has no fundamental effect on the results.
Clamping can get more complicated when transparency is involved.
Suppose you have an image with transparency, and you want to resize it and apply a solid-color background. Here are some ways you could do that.
Start with this image  . Note that its center is
transparent
.
. Note that its center is
transparent
.
1. , apply a background color  ,
then resize
,
then resize  .
.
2. , resize, converting back to unassociated
alpha without first clamping the
alpha channel, then clamp all channels  ,
then apply a background
,
then apply a background  .
.
3. , resize, clamp the alpha channel before converting
back to unassociated
alpha, then clamp all channels  ,
then apply a background
,
then apply a background  .
.
4. , resize, then apply a background color without any
clamping, then clamp the
(color) channels  .
.
(1) and (4) have identical results, and I believe they are the most technically correct. Note that (1) is only possible if the background is a solid color. I would judge (3) to be the worst of the lot. It’s what you get if you don’t allow out-of-range opacity values even temporarily. (2) probably looks the best, and is the best you can do if the intermediate image is stored in PNG format, or any format that does not allow opacity values of more than 100% or less than 0%.